How to create a ChatGPT Ads campaign, step by step
A beginner's walkthrough of the OpenAI Ads Manager — campaign structure, objectives, bidding, budgets, targeting and the defaults worth changing.

Advertising on ChatGPT works differently to advertising on Google or Meta, and most of the difference is hidden in defaults you will click straight past.
This walks through the whole build, field by field, in the order the Ads Manager presents them. Everything below is from the live panel at ads.openai.com, which is still labelled Beta and still changing. Nothing here assumes you have run ads before.
Updated 16 September 2026: Conversions campaigns now bill by impressions, there are five platforms to target instead of three, and the tracking field has been renamed. The sections below reflect that; the September update has the details.
Before you can run anything#
Two things gate the account, and neither is part of building a campaign. You can construct a complete campaign without them and only discover at the end that nothing will serve.
- Billing. Set up under Billing → Settings.
- An account logo. A logo or favicon, uploaded to the account. Your ads carry your business name and mark, so the account will not serve without one.
Until both are done, a banner sits across the top of every page reading "Ads cannot serve until you finish account setup." Do these first.
The three levels#
Everything in the Ads Manager lives in a hierarchy three levels deep. If you have used any other ad platform this will look familiar, but the split of what lives where is not identical, and putting a setting at the wrong level is the most common way to make a mess you have to unpick later.
| Level | What it controls |
|---|---|
| Campaign | Budget, objective, schedule, locations, platforms, audiences |
| Ad group | Bidding, destination URL, what conversations you want to appear in |
| Ad | The actual headline, description and image people see |
One campaign can hold several ad groups. One ad group can hold several ads. Money and targeting are set at the top, matching in the middle, creative at the bottom.
The practical rule: one campaign per goal, one ad group per theme, at least two ads per ad group. Splitting further than that mostly starves each piece of the data it needs to learn.
Starting the build#
From Campaigns, the Create button offers Create campaign or Upload bulk. Take the first one.
The wizard does something unusual here. Rather than opening empty, it reads your website and hands you a finished campaign — name, budget, locations, ad copy and all — with an AI generated badge on it. It is a reasonable starting point and a terrible thing to publish unread.
There is a Create from scratch button in the top right of that screen. For your first campaign, press it. You will learn more from filling twelve fields than from auditing twelve fields someone else guessed at.
Step 1: the campaign#
Campaign name#
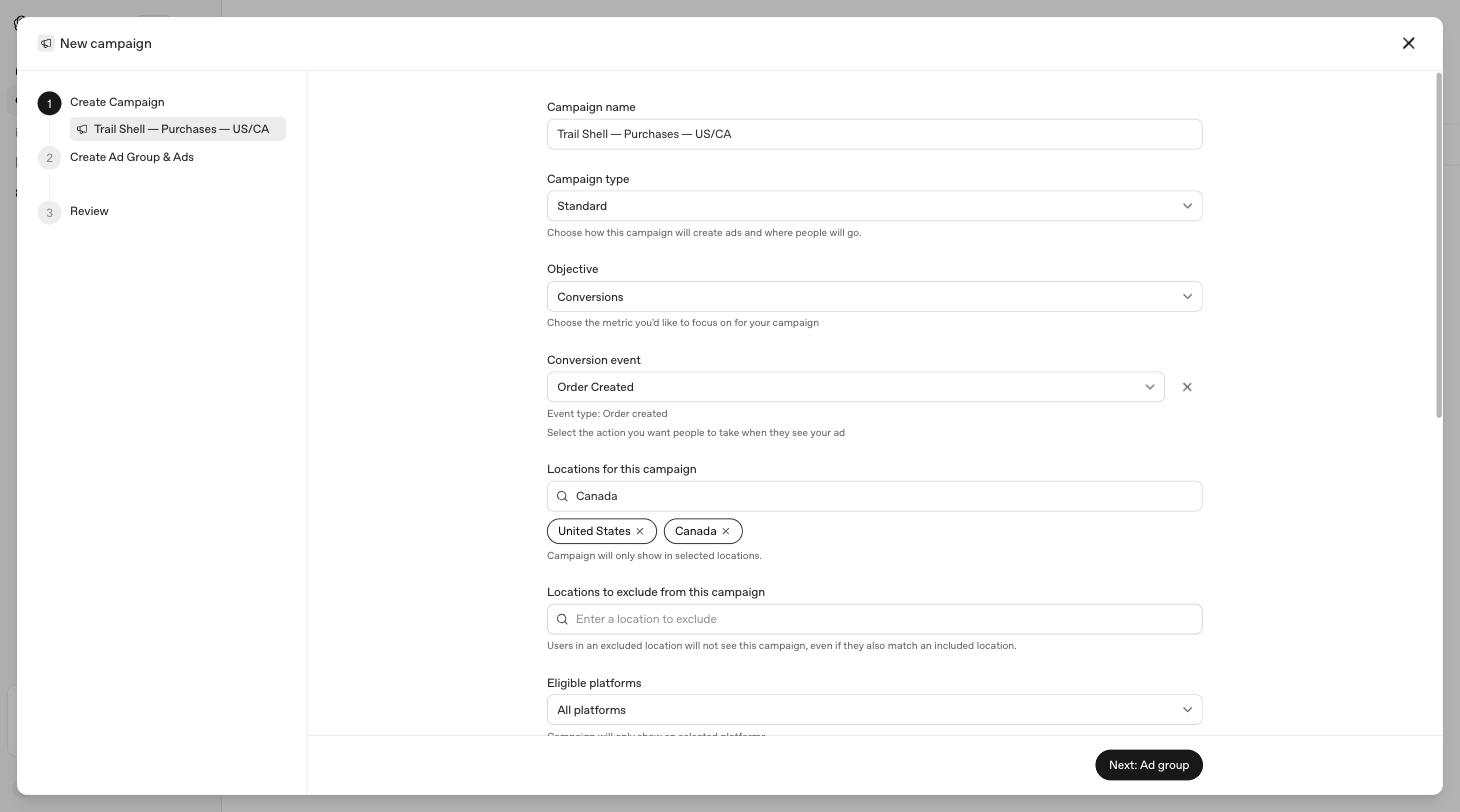
Only you will ever see it. Use a name that still means something in six months when there are thirty of them — what you are selling, what you are optimising for, and where. Trail Shell — Purchases — US/CA beats Campaign 3.
Campaign type#
Two options:
- Standard — you write the ads yourself. This is what you want unless the next line describes you.
- Product feed — ads are generated from a product feed you upload under Tools → Feeds. For a catalogue of hundreds of products, this saves you building hundreds of ads by hand.
Objective#
Three options, and this choice changes what the rest of the panel offers you.
| Objective | Optimises for | Use it when |
|---|---|---|
| Reach | People seeing the ad | You want awareness and have nothing to measure yet |
| Clicks | Visits to your site | You want traffic, or you have no working conversion tracking |
| Conversions | A specific action you define | You have tracking that works and something worth counting |
Conversions is the one you eventually want, but only once your tracking is sound. A conversion campaign optimising against broken data will confidently spend your money in the wrong direction.
Picking Conversions makes the conversion event mandatory. The field is labelled "Conversion event (optional)" under the other two objectives, and quietly drops the "optional" the moment you switch. You cannot proceed without attaching an event.
Conversion event#
A dropdown of events you have already set up under Tools → Conversions, plus a Create new conversion shortcut. Pick the action that actually represents value — for a store, that is the purchase.
If the list is empty, you have not set up tracking yet, and you should do that before running a conversion campaign at all.
Locations#
Two fields: locations to include, and locations to exclude. Both search down to region level, not just country, so Ontario, Canada is as valid as Canada. Exclusions win — someone in an excluded region will not see the campaign even if they also match an included one.
Eligible platforms#
Five checkboxes: Android app, Android web, Desktop web, iOS app and iOS web. All five are on by default, shown as "All platforms".
Leave them all on to start. Turn one off only when you have a real reason — if your checkout is broken in mobile browsers, say, or you are advertising desktop software. Performance can be broken down by the same five platforms, which is the easiest way to spot that kind of problem.
Tracking parameters#
Labelled "Landing page query parameters" until September. This is the field most people skip and later wish they hadn't. It appends parameters to every landing page URL in the campaign, so your analytics can tell where a visit came from.
You can use these template values, which get filled in at click time:
{campaign_id}
{ad_group_id}
{ad_id}
{ad_account_id}
{oppref}
{oppref} is the click reference — the identifier that connects a click to a later conversion.
You cannot name a parameter oppref or olref yourself. They are reserved. Try it and the field rejects the whole string: "Reserved query parameters are not supported: olref, oppref." The platform appends oppref to your landing page URL on its own; your job is not to duplicate it.
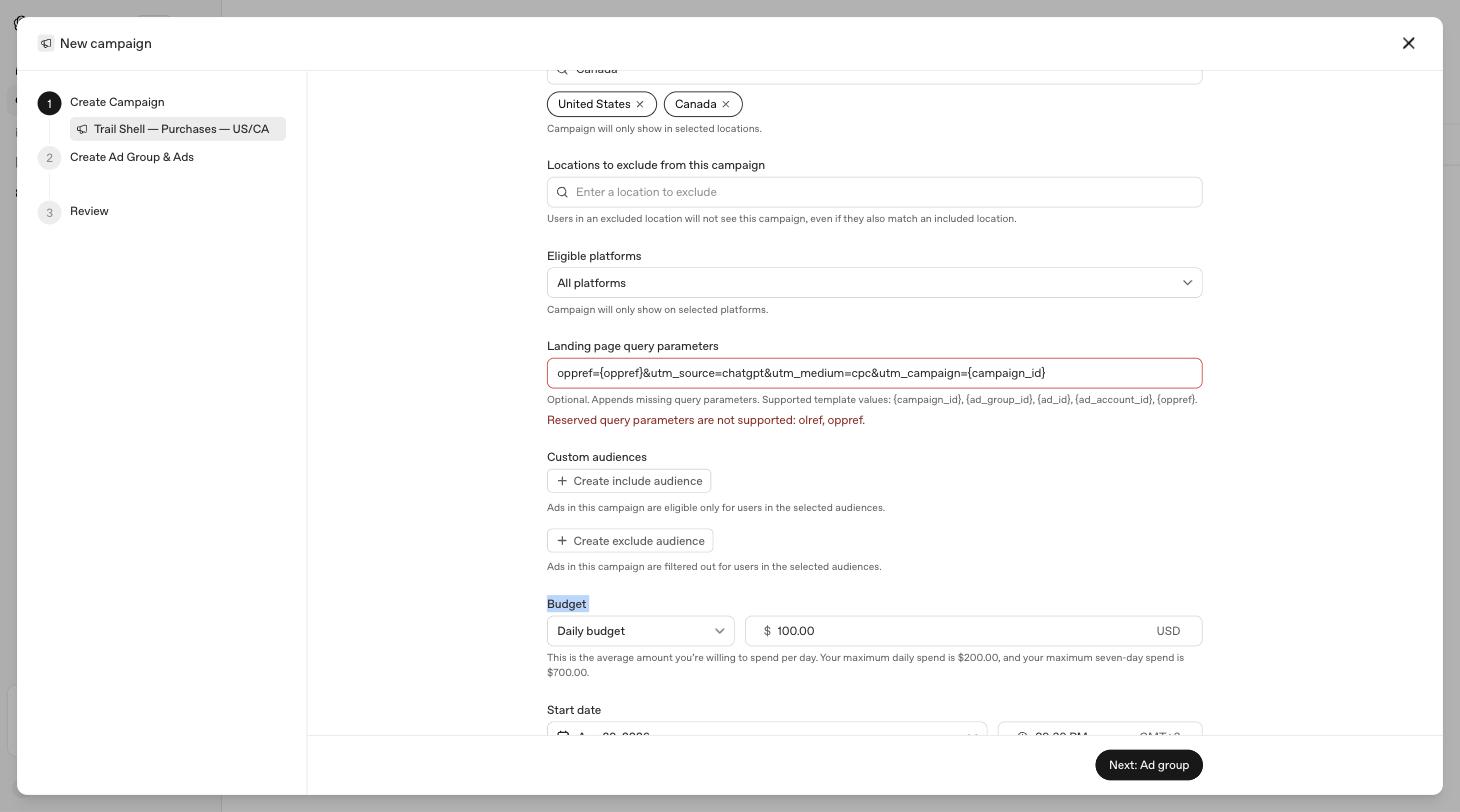
What you can do is mirror the value into a parameter of your own, which is useful if your analytics tool needs to read it under a different name:
utm_source=chatgpt&utm_medium=cpc&utm_campaign={campaign_id}&click_ref={oppref}
That is accepted. Note the wording on the field: it appends missing query parameters, so anything already on your URL is left alone.
Custom audiences#
Include and exclude lists, built under Tools → Audiences from a CSV or TXT file of emails, phone numbers, or Android advertising IDs. Include means only those people are eligible; exclude filters them out — useful for suppressing existing customers from an acquisition campaign.
Worth knowing before you upload anything: the panel accepts raw emails and phone numbers as well as SHA-256 hashed ones. Whether you should send raw customer data to an ad platform is a separate question from whether the box will accept it.
Budget#
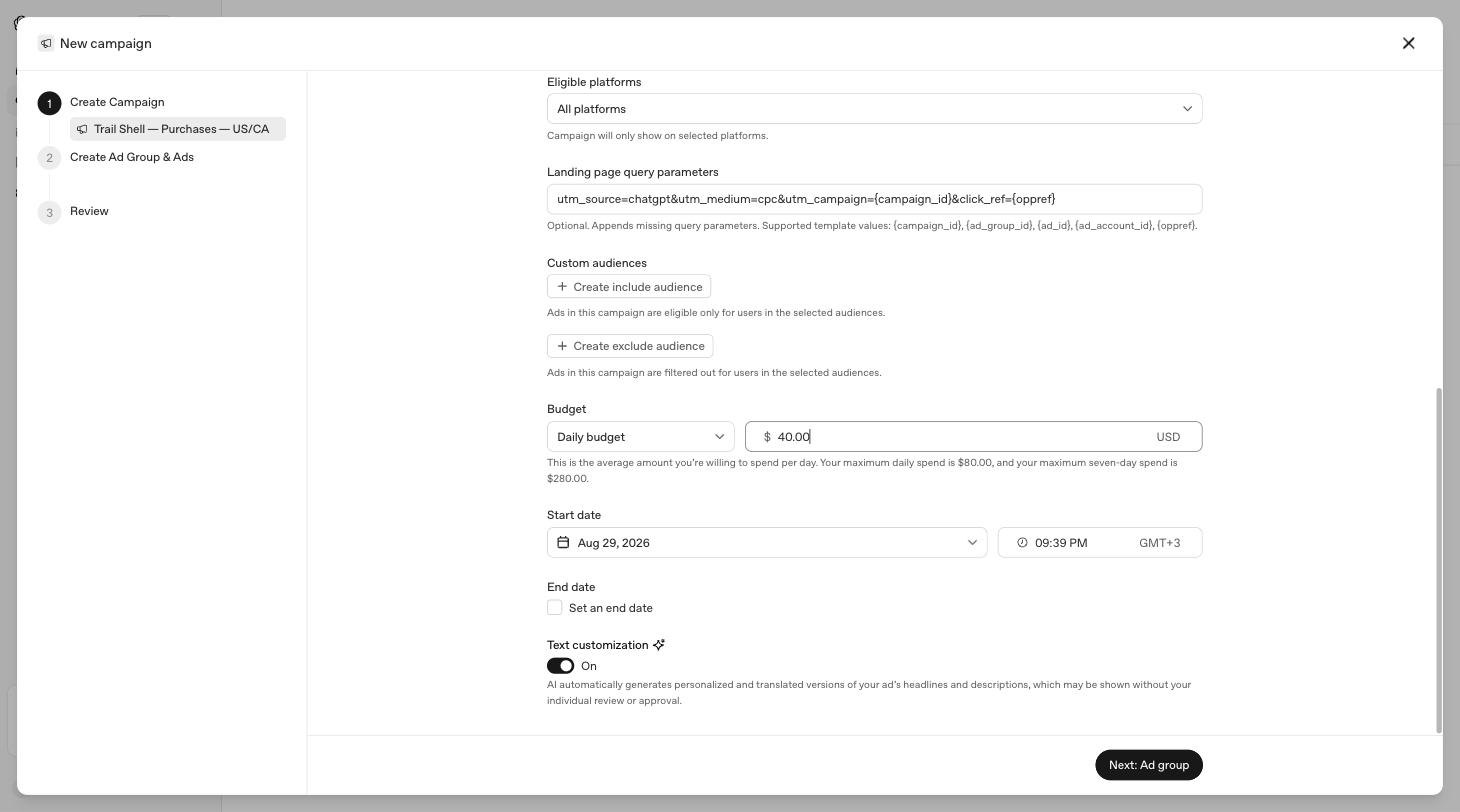
Two modes, Daily budget or Campaign total budget, plus an amount.
Daily is the normal choice. It is an average rather than a ceiling, and the panel tells you the actual ceilings directly underneath as you type. At $40 a day it reads:
Your maximum daily spend is $80.00, and your maximum seven-day spend is $280.00.
So a daily budget can double on any given day, but the week is capped at seven times the number you set. Change the amount and both figures update live.
Start lower than feels useful. You are buying information for the first week or two, not results. You can raise a budget in seconds; you cannot unspend money.
Schedule#
A start date and time with an explicit timezone, and an optional end date via a Set an end date checkbox. Leaving the end date off means it runs until you stop it. Set one if the campaign is tied to a promotion that ends.
Text customization#
A toggle, on by default, described as:
AI automatically generates personalized and translated versions of your ad's headlines and descriptions, which may be shown without your individual review or approval.
Read that last clause again. With this on, copy you never saw can be shown to customers under your business name. That may be exactly what you want — it is how you get local-language variants without writing them — but it is a decision, not a default to inherit. If you are in a regulated industry, or if specific wording matters to you, turn it off.
Step 2: the ad group#
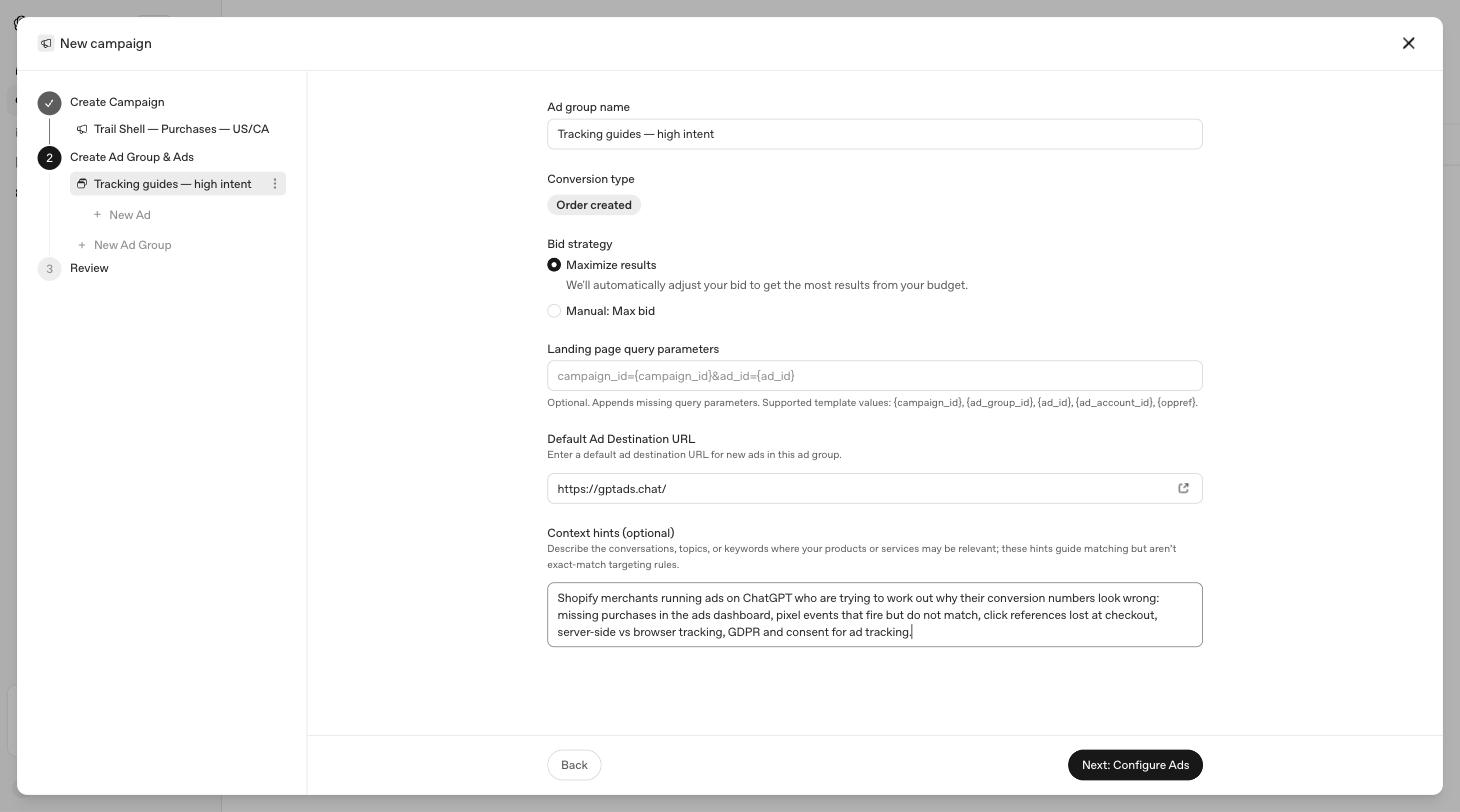
The ad group inherits the campaign's conversion event, shown as a chip near the top, and adds three things of its own.
Bid strategy#
This is your bidding decision, and there are only two options.
Maximize results — described in the panel as "We'll automatically adjust your bid to get the most results from your budget." You set the budget, the platform decides what each click or conversion is worth. This is the default and the right starting point for almost everyone.
Manual — you set a ceiling yourself. The label changes with your objective: it reads Manual: Max CPC under a Clicks campaign and Manual: Max bid under a Conversions campaign. Either way you are naming the most you will pay for one of the thing you asked for.
Billing depends on the objective. A Reach campaign is bought on cost-per-thousand-impressions and you set a maximum CPM bid; a Clicks campaign is bought on cost-per-click and you set a maximum CPC. A Conversions campaign is now billed by impressions while still optimising toward your conversion event — the panel says "Billed by impressions" as soon as you pick the objective, and OpenAI calls this its recommended model. The objective, billing model and conversion event can't be changed after the campaign is created. OpenAI's documentation suggests starting a CPC campaign at a maximum bid of $3–$5, and Ads Manager may show bid-strength guidance indicating whether your bid is likely to be competitive.
Selection runs as a relevance-weighted, second-price auction, so a higher bid buys you eligibility rather than a guaranteed placement — relevance is doing real work alongside it.
Start on Maximize results. Manual bidding is only useful once you know what a customer is actually worth to you, and you cannot know that from an account with no history. Setting a manual bid too low on day one is a common way to have a campaign that simply never spends and teaches you nothing.
Default Ad Destination URL#
Where clicks land, used as the default for new ads in this ad group. Individual ads can override it.
Send people to the page that matches the ad, not your homepage. If the ad is about one product, the destination is that product.
Context hints#
This is the field that makes ChatGPT Ads different from search advertising, and it deserves a slow read. The panel describes it as:
Describe the conversations, topics, or keywords where your products or services may be relevant; these hints guide matching but aren't exact-match targeting rules.
There is no keyword list. Anywhere. You are not bidding on strings. You are describing, in ordinary prose, the kinds of conversations where your product belongs, and the platform decides where that fits.
So write it like a description, not a keyword dump. Something like:
Shopify merchants running ads on ChatGPT who are trying to work out why their conversion numbers look wrong: missing purchases in the ads dashboard, pixel events that fire but do not match, click references lost at checkout, server-side vs browser tracking, GDPR and consent for ad tracking.
Include the problems your customer is describing in their own words, not just your product category. Someone asking ChatGPT how to fix a leaking tap is a better match for a plumber than someone asking what a tap is.
Step 3: the ad#
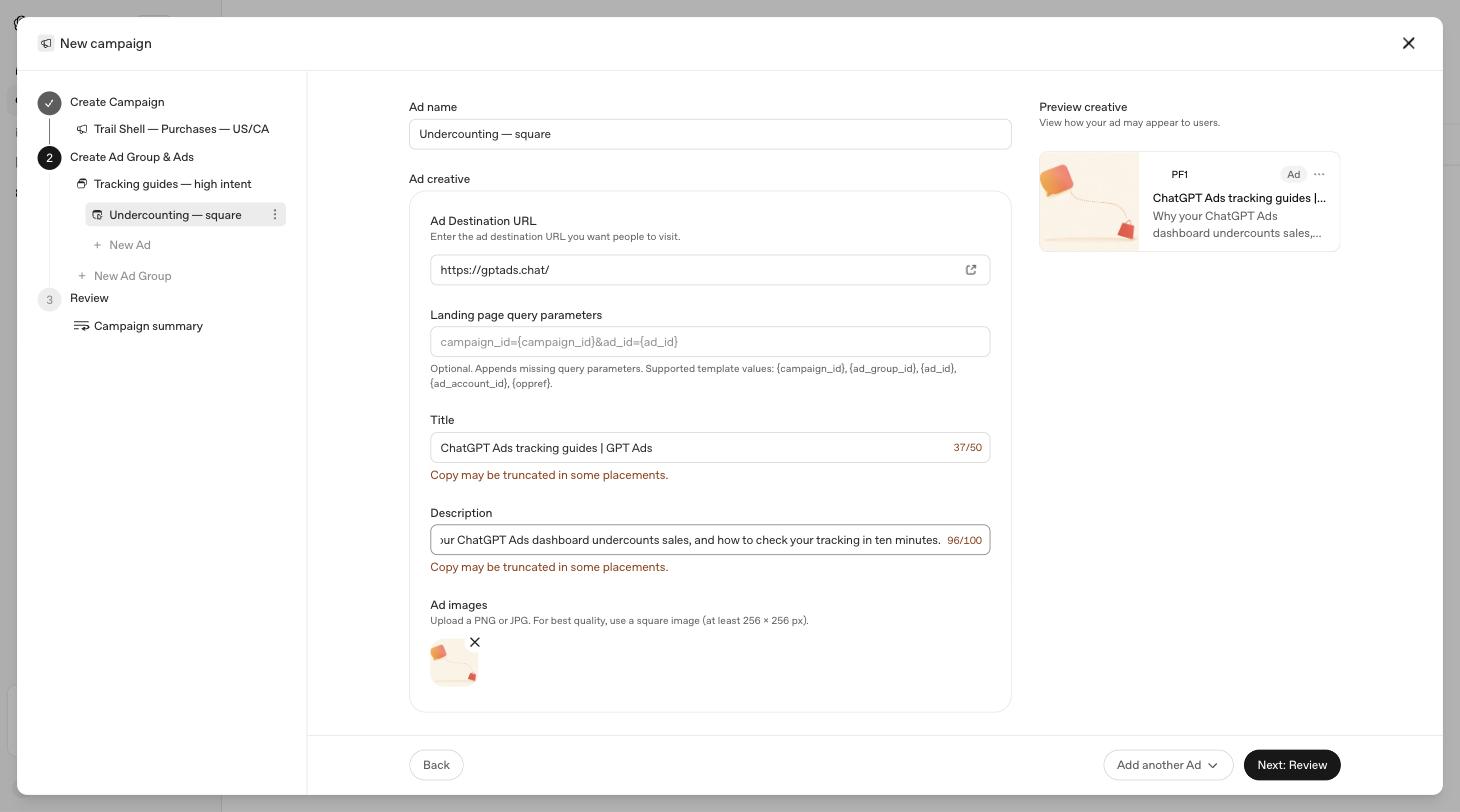
Enter a destination URL and the panel goes and reads that page, then fills in a title and pulls an image from it. Useful, and worth checking rather than accepting — it is guessing at your positioning from your markup.
Title and description#
The title takes 50 characters, the description 100, and both have live counters. Ignore the counters.
A 37-character title and a 96-character description both still warned "Copy may be truncated in some placements." The field maximum and the display maximum are different numbers, and only the second one matters. Front-load the important words and assume the tail gets cut.
Ad images#
PNG or JPG, square, at least 256×256 pixels. Square is the guidance, so give it a square file — an image cropped by the platform is an image you did not design.
More than one ad#
An Add another Ad button sits next to the primary action. Two or three ads per ad group gives the system something to choose between. One ad gives it nothing to learn from.
Review and publish#
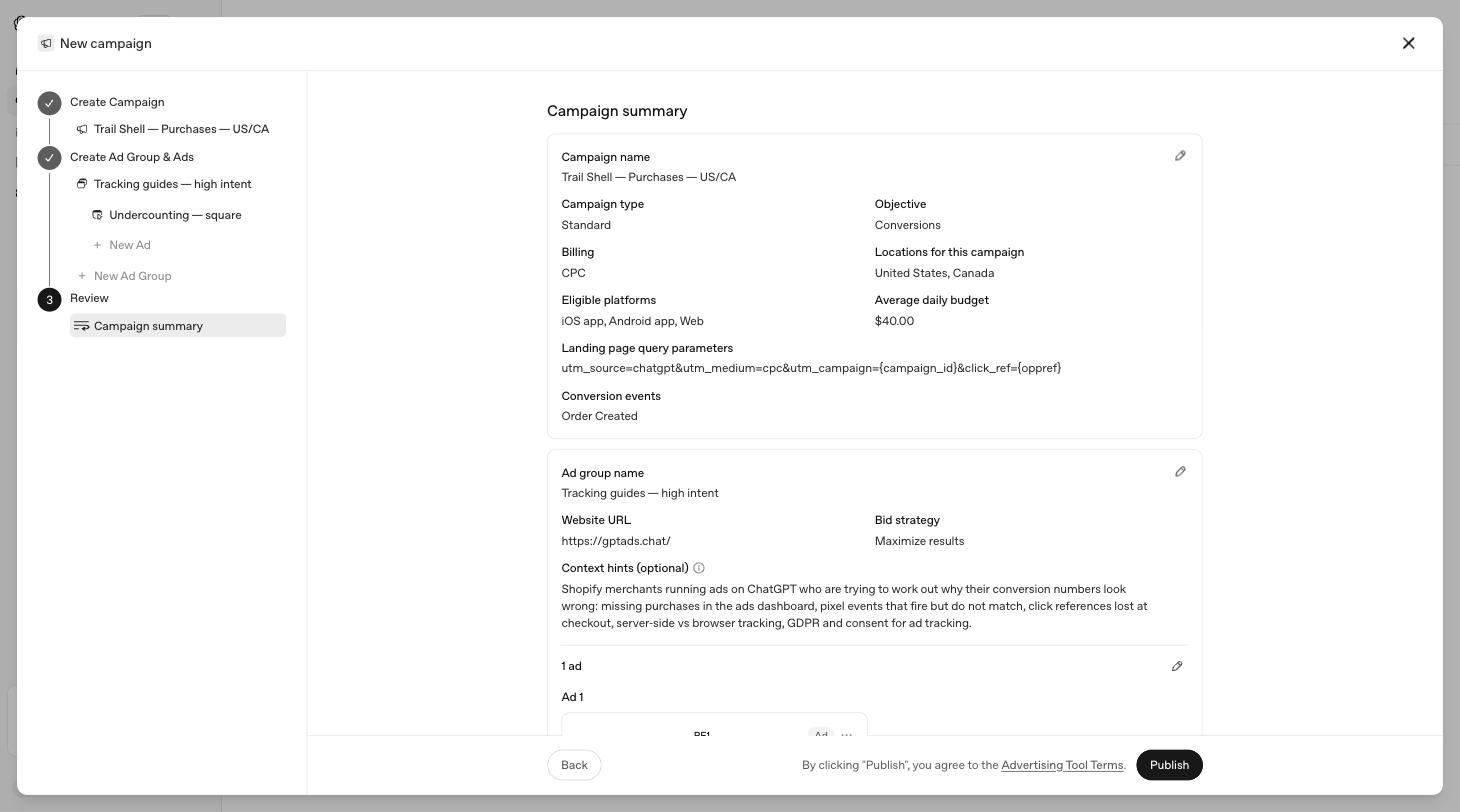
The final screen lays out every setting in one summary, with pencil icons to jump back to anything, and a Billing: CPC row that does not appear anywhere in the wizard itself. Publishing agrees to the Advertising Tool Terms, linked next to the button.
Read this screen properly. It is the only place the whole campaign is visible at once, and it is much easier to catch "United States, Canada" when you meant only one of them here than in a spend report next week.
The defaults worth changing#
If you take nothing else from this, take these five:
| Default | Why it matters |
|---|---|
| Text customization is On | Copy you never approved can run under your name |
| The AI-generated campaign | Written from a scrape of your site; check every field |
| Auto-filled ad title and image | Same — the panel guessed, verify it guessed well |
| Budget suggestions | You can raise a budget instantly; you cannot unspend |
| All platforms on | Fine to keep, but know your checkout works on all three |
After it is running#
Go to Tools → Conversions and look at three things. They are the fastest read on whether your money is buying measurable results or just traffic.
- Warnings. A panel that names specific failures, including an Invalid event payload count with the reason — unknown event type, invalid timestamp, missing web source URL. It covers the last seven complete UTC days.
- Identifier coverage. A percentage column on the Conversion Events tab showing how many of your events arrive with a usable identifier. A low number here means conversions are landing but cannot be matched to the ads that caused them.
- Event Stream. A live view with a play button, showing each event as it arrives with its raw JSON.
If identifier coverage is at zero, stop optimising the campaign. Fix the tracking first — a Conversions campaign fed by unmatched events is bidding on noise.
I build LLM Pixels, a Shopify app for ChatGPT Ads conversion tracking.